Entra ID (Azure AD) SCIM 2.0 setup by Contractbook
Below are the steps to configure a SCIM integration with Contractbook in Microsoft Entra ID (used to be called Azure AD).
Requirements to establish the integration:
Make sure you have the following:
- A working Entra ID setup with the users from the organization you wish to synchronize with Contractbook.
- A secret Token for an admin user, provided to you by Contractbook.
- Our Tenant URL: https://api.contractbook.com/scim
Create an enterprise application
- First, head to Azure Portal and search for Enterprise Application in the search bar:

- Click on New application to create a new Enterprise Application:

- Contractbook’s application is not in Azure's gallery yet, so you must create your own.
- Click on Create your application:

- In the creation dialog, begin by setting the name for your application.
- In the example below, we chose Contractbook SCIM, but it can be named in a way that fits you best.
- Make sure the option "Integrate any other application you don’t find in the gallery" is selected:
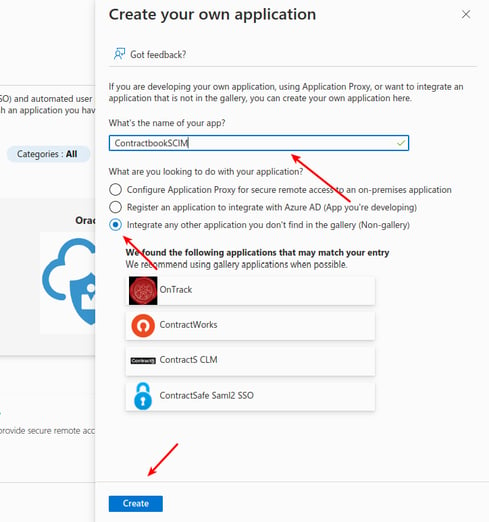
- Once you are ready, click on the Create button to confirm.
- Shortly after, you will be redirected to your application. If the redirection does not occur, repeat the search for Enterprise Application in the search bar, and you should now be able to see your application among the list.
Provisioning configuration
Once you are in the application configuration, you can configure user provisioning.
The provisioning process, when successful, will keep your organization's users in sync with Contractbook.
For provisioning, you need the following:
- Tenant URL: https://api.contractbook.com/scim
- Secret Token: provided to you by Contractbook
Here are the steps you need to follow once you have all the requirements:
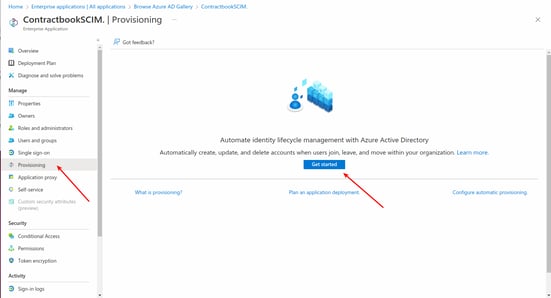
- Under the Manage menu, click Provisioning.
- Click Get Started to open the dialog to configure provisioning:
- Contractbook’s provisioning is automatic, so choose Automatic from the dropdown menu:

- Under the Admin Credentials accordion form, you must paste the Tenant URL and the Secret Token you already have.
- Click the Test Connection button to ensure your credentials work with Contractbook:
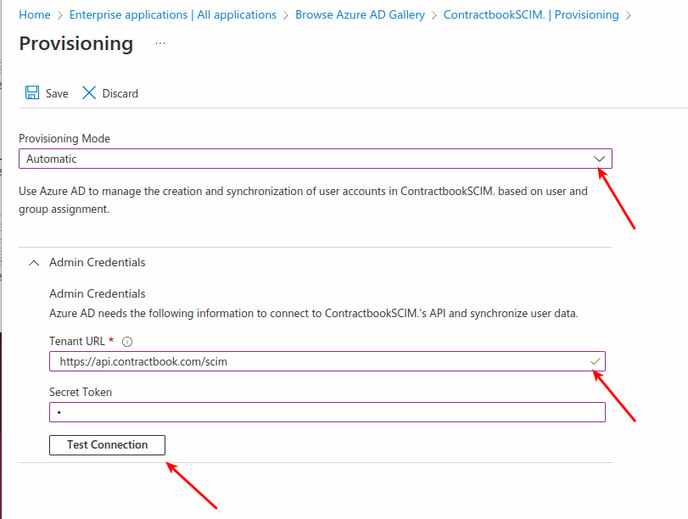
- If everything succeeds, you can save this configuration.
Provisioning users
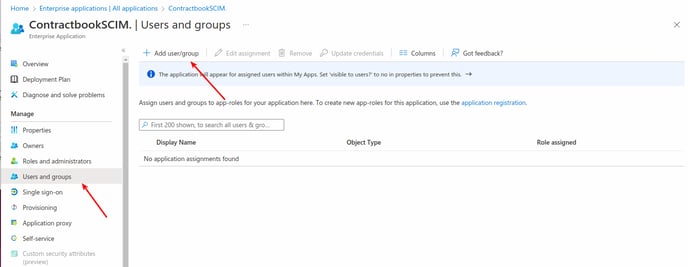
- Click the Users and groups under Manage and configure the users you want to sync with Contractbook.
- Please note that at least one organization admin should be present in the users selected. This is required for certain Active Directory setups where the admin needs to accept Contractbook's permissions on behalf of the organization:
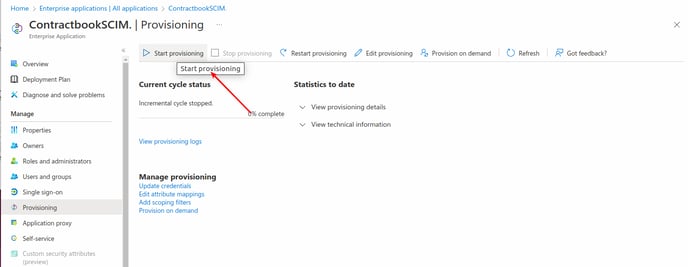
- Click Provisioning under Manage, and click Start provisioning:
Provisioning groups
You can also provision groups from Entra ID into Contractbook in the same way you provision individual users. Provisioning a group will create a user group in Contractbook, which you can use to give access to contract and template spaces.
Note: Groups is a premium feature and you might need to reach out to your Contractbook contact person to enable this for your account.
And that's it!
- Usually, the first provisioning update should take 5 to 15 minutes, depending on the size of your organization.
- Provisioning occurs every 40 minutes, so any update to your users will be synchronized after that time.
Accepting permissions on behalf of the organization
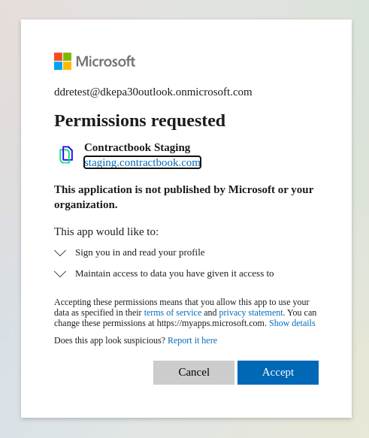
- For specific Azure Active Directory setups, an admin must obtain the licenses on behalf of the organization so users can use Contractbook's Single Sign On (SSO).
- You will know you have this setup when your users start reporting problems like the following:
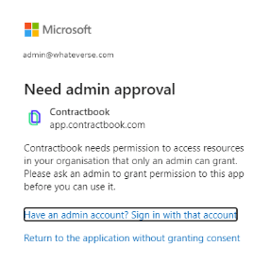
- To fix this, the admin needs to log into Contractbook's main platform and accept the permissions:
