How can I use the "Webhook request is received" automation trigger?
- To trigger a workflow using a webhook, you need to configure the webhook, which will start your workflow in Contractbook when an event you specify occurs in another application.
- The "webhook request is received" trigger allows you to trigger the automation from a third-party application (or service) by making an HTTP POST request to the URL generated by that trigger and mapping the data from the request's payload to the variables used in the subsequent automation actions.
- The webhook trigger waits to be called/prompted by your external app. The payload is a correspondence table that allows you to reuse all data sent by the third-party app in your Contractbook workflow. The webhook action works independently from the trigger, and you may use it on other workflows or the same workflow similar to a callback function.
- The webhook trigger and action are independent. Read more about using the "send a webhook request" automation action here.
"Webhook request is received" - configuring the automation trigger
- Choose Automations from the top main menu in Contractbook app and click on Create new button.
- Select Webhook request is received from the drop-down list of available trigger options for the automation setup:

- Now proceed with the Automation action configuration in the window, which will automatically open on the right-hand side of the screen:

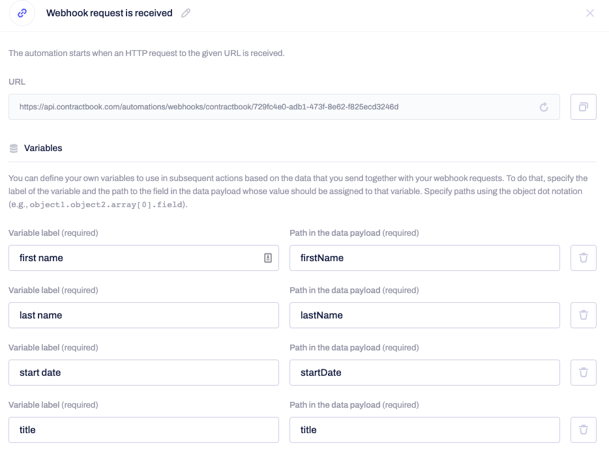
- You can generate a unique URL to which other services can make POST requests.
- You can then specify the paths to the fields in the data payload and assign specific variable names to them.
How to configure your webhook trigger in the Automation Builder?
The external service you choose to create and configure your webhook needs to provide you with the ability to make an HTTP POST request to Contractbook as soon as a specific event occurs.
Contractbook will generate a unique request URL for your workflow in the trigger event of the automation setup, and you can simply copy the generic URL and paste it into the external service (or tool) with which you want to integrate Contractbook.

- You can then configure your webhook to give information to Contractbook via HTTP request.
Mapping fields in the webhook action
- Any data your webhook (from the external system you choose) sends to Contractbook can be referred to in the following automation steps by constructing variables.
- You need to add variable labels - these will become new data fields created directly as a result of the automation:
- Naming conventions - use small letters only, without spaces and _ sign to separate words.
- After defining a variable label, you must match it with a path in the data payload.
- These values can be static (manually input text) or dynamic data from Contractbook (data fields, party, or signee details).
- Once you have added the path in the data payload values, copy the same field path from the respective fields in the automation builder and paste those into your external system.

Create custom variables
To create a custom variable, you must add a key-value pair in the in-app Automation Builder as a text-based variable.
You can define any custom variables for subsequent actions based on the data you send and your webhook requests.
To do that, you must specify the variable's label and the path to the field in the data payload whose value should be assigned to that variable. Specify paths using the object dot notation (for example, object1.object2,array[0].field).
Get your web request URL
The automation starts when an HTTP request to the given URL is received.
Request URLs start with https://api.contractbook.com/automations/webhooks/contractbook/ and are followed by a randomized string of characters.
❗️Important: Keep your request URL as secure as possible. Preferably, it should only be used internally inside your company; anyone with the link can trigger your automation.
Note: Webhook workflows are limited to one request per second.Regenerate a webhook URL
If a webhook’s URL gets exposed or needs to be changed for any reason, follow the steps below:
- Open the webhook automation flow you have configured in the in-app Automation Builder
- Click on the small icon next to the URL field
- Select Generate new URL and save your changes

How can I test webhook triggers in the Automation Builder?
- To test Webhook triggers, you do not have to specify any paths to fields. You can simply publish the automation without specifying any fields.
- The data payload of any requests made can be seen in the automation history.
Using the activity feed of automation with a webhook trigger
If you check the activity feed of a successfully run automation based on the "Webhook request is received" trigger, you will see the returned data payload - including everything which was filled out as a result of the automation, without empty fields.
If you still need additional information or assistance, reach out to us anytime by contacting our Support Team .
