This article will show you how to automatically upload signed contracts and enrich them with data fields.
It contains the following topics:
- Using the "upload document" automation action
- Configuring the automation trigger
- Configuring the automation action
- Using the document details section
- Enriching the uploaded documents with data
- Publishing the automation
- Testing the automatic upload
- Fixing a failed automation
- Checking a successfully run automation
How can I use the "upload a document" automation action?
- This automation action allows you to upload any pre-signed contract (for example, your legacy or vendor contracts) to Contractbook without any manual effort.
- This way, you can turn all your external static contracts into native data-enriched ones directly in the automation builder.
- All uploaded contracts will be scanned with a special OCR tool, and dates will be suggested for complete reminder task automation.
- You can add any additional actions following "upload document," and this way, auto-populate your contracts with data and metadata fields, tasks, and more.
- We recommend combining that step with the "transform data" automation action for additional formatting and calculations based on your uploaded contract's data.
How does the automation action work?
- The upload action has to include a direct URL to the contract you wish to import.
- The URL has to be publicly accessible, and the file it links to must be in one of the following formats:
.csv,.doc,.docx,.jpeg,.jpg,.pdf,.png,.txt,.xls,.xlsm, or.xlsx. - You can also use a form with an "upload" type of question to directly fetch the URL to all submitted to its contracts and automatically upload them to your Contractbook account.
- Once the automation runs, the contract will be automatically migrated to Contractbook and simultaneously turned into a data-rich document with a determined-by-you list of parties, data, and metadata fields.
- You can mark the contract as "signed" directly in the automation builder.
- Add "create or update data fields," action to your uploaded documents and ensure to enrich them with all essential variables for reminder task automation, or use "transform data" for accurate formatting and calculations based on data fields.
How can I use the "upload document" action?
You can use a Google sheet file with rows representing the contracts you want to import, public links, a webhook to Contractbook with links, or a completed form with an upload type of question.
All options will allow you to successfully use the "upload document" action.
How to upload signed contracts submitted in a form automatically?
What do I need to configure this automated workflow:
- You need an import form with an "upload" type of question for your contracts' submission.
- You can start with a "form is completed" trigger in the automation builder and attach the uploaded files under the "document URL" section of the "upload document" configuration step.
Configuring the automation trigger:
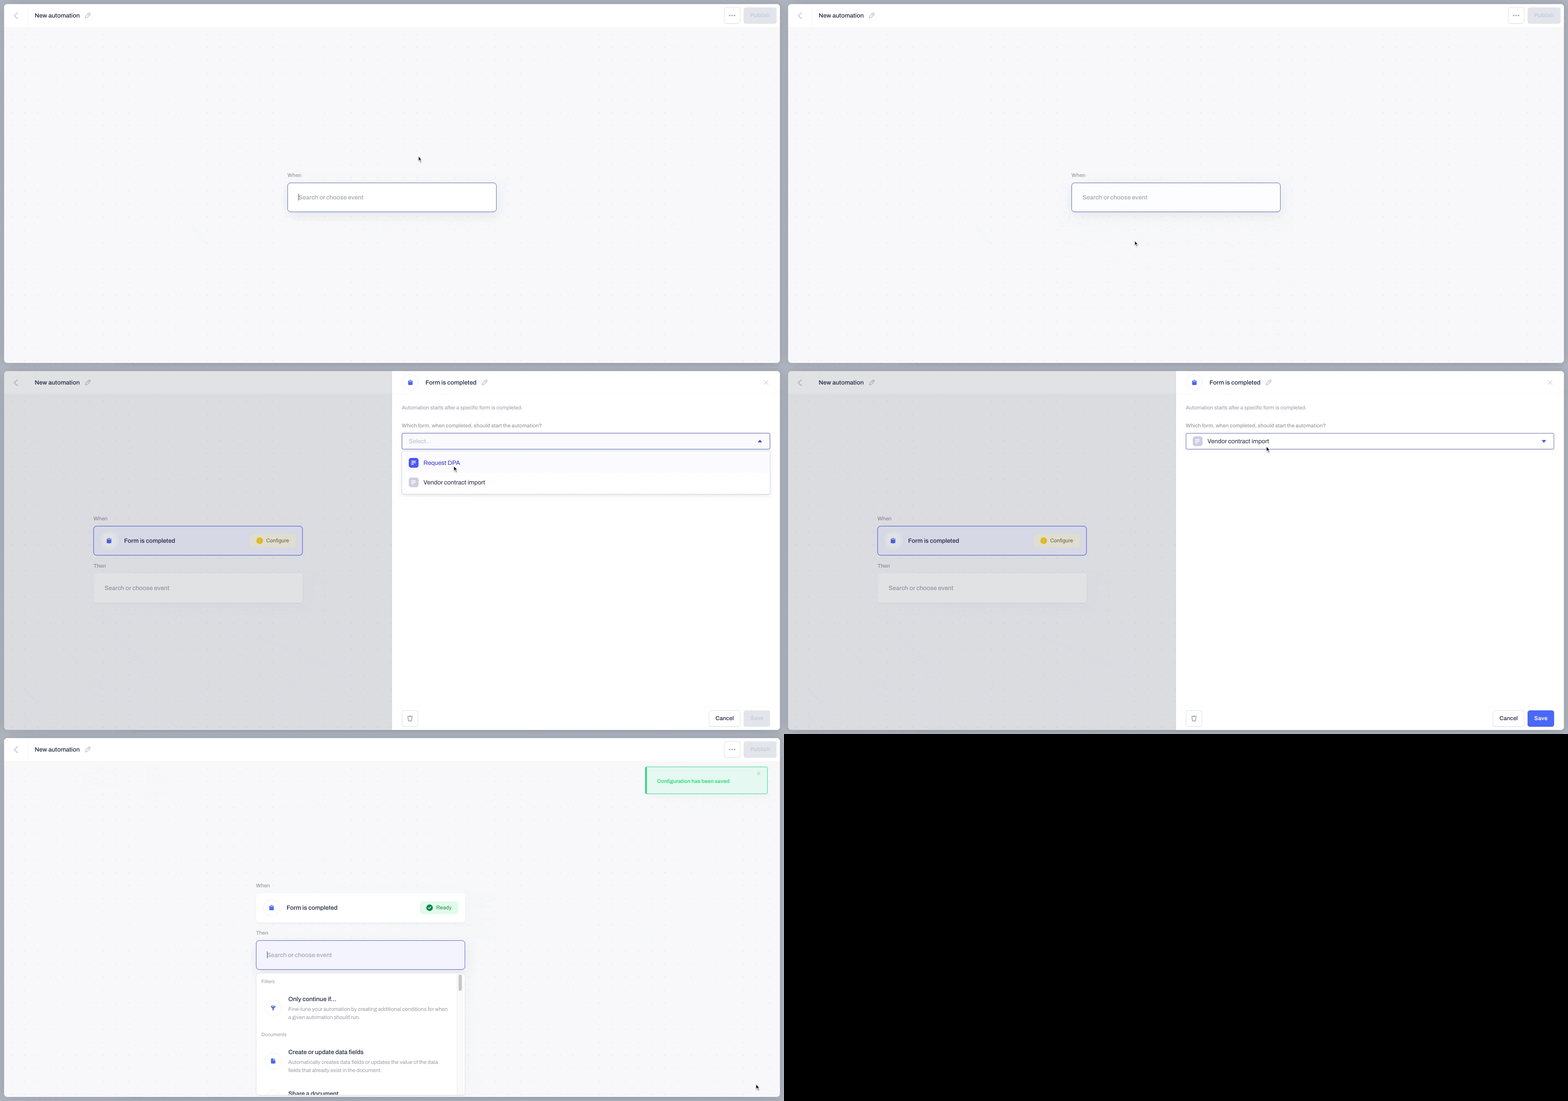
- Click on the Automations tab from the main menu and then on the blue button Create new at the upper right-hand corner.
- You will be redirected to a pop-up window where you can customize the automation's setup. To begin with, select the trigger you need from the drop-down menu. In our case, we will choose "form is completed."
This will automatically open a configuration window to the right in which you can define which form should be completed to upload the submitted to it contracts in Contractbook. - After choosing the correct form, which will activate the automated flow, confirm by clicking Save:
Configuring the automation actions:
This step covers the actions that will happen automatically when any respondent completes the import form.
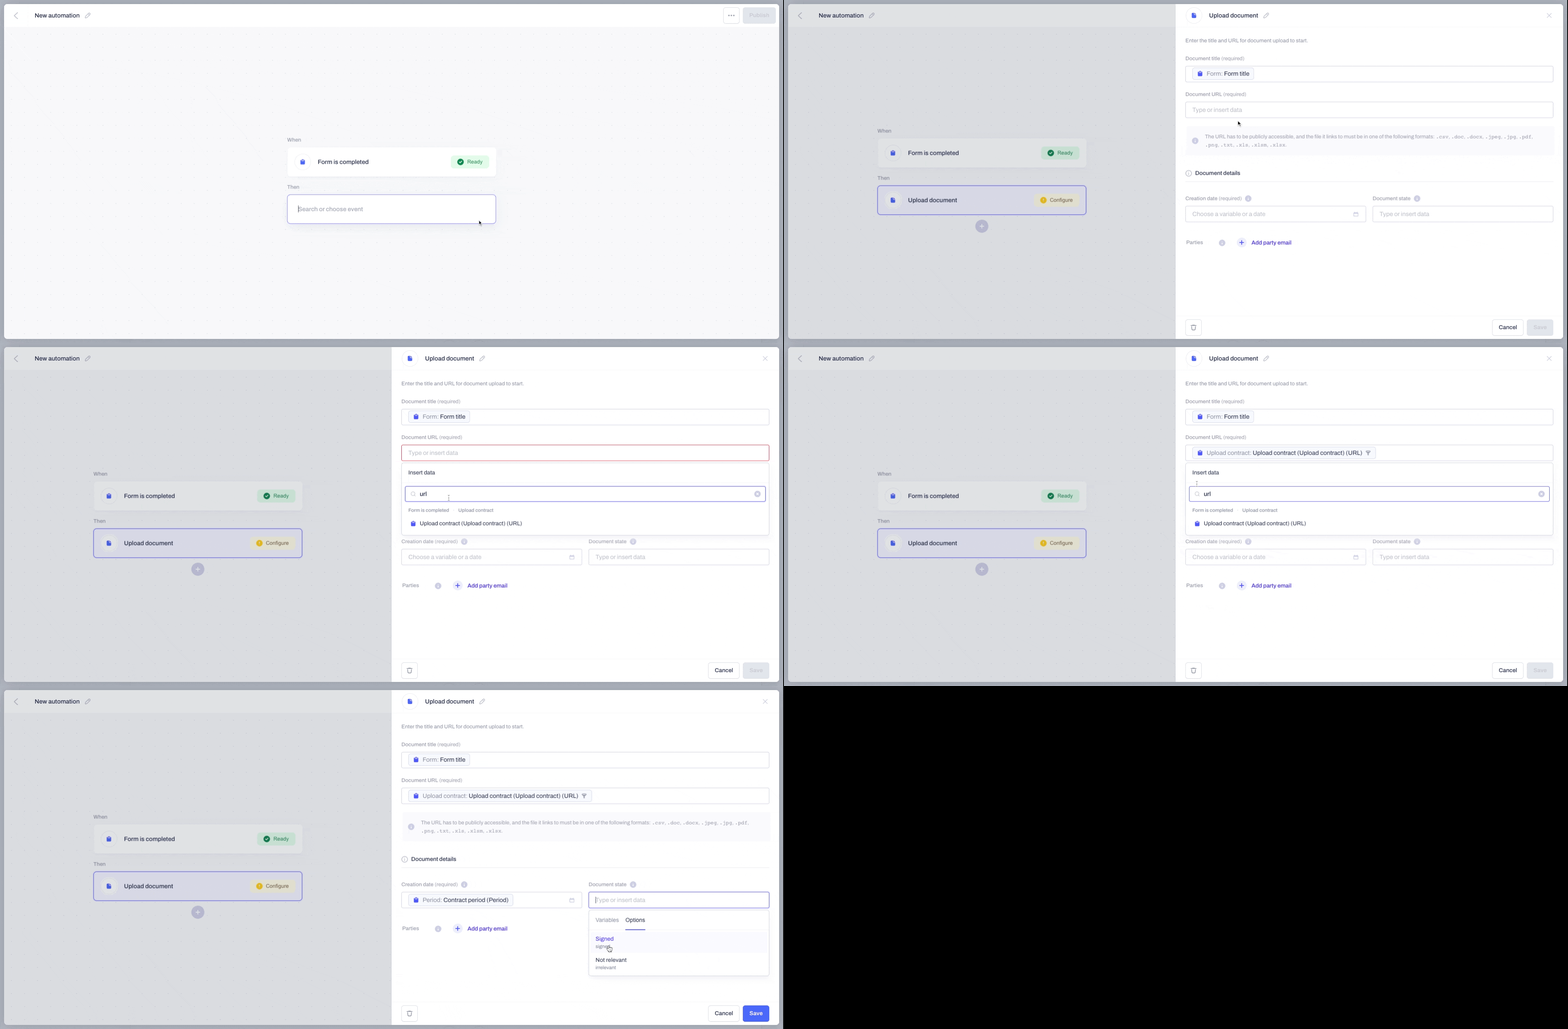
- You can use the search bar to locate the option to upload document.
- A new configuration window will appear on the right side of the screen.
- Enter the title and URL for the contract upload to start.
- You can insert both data points manually or use any of the available variables from the selected form:
How do I use the contract details section?
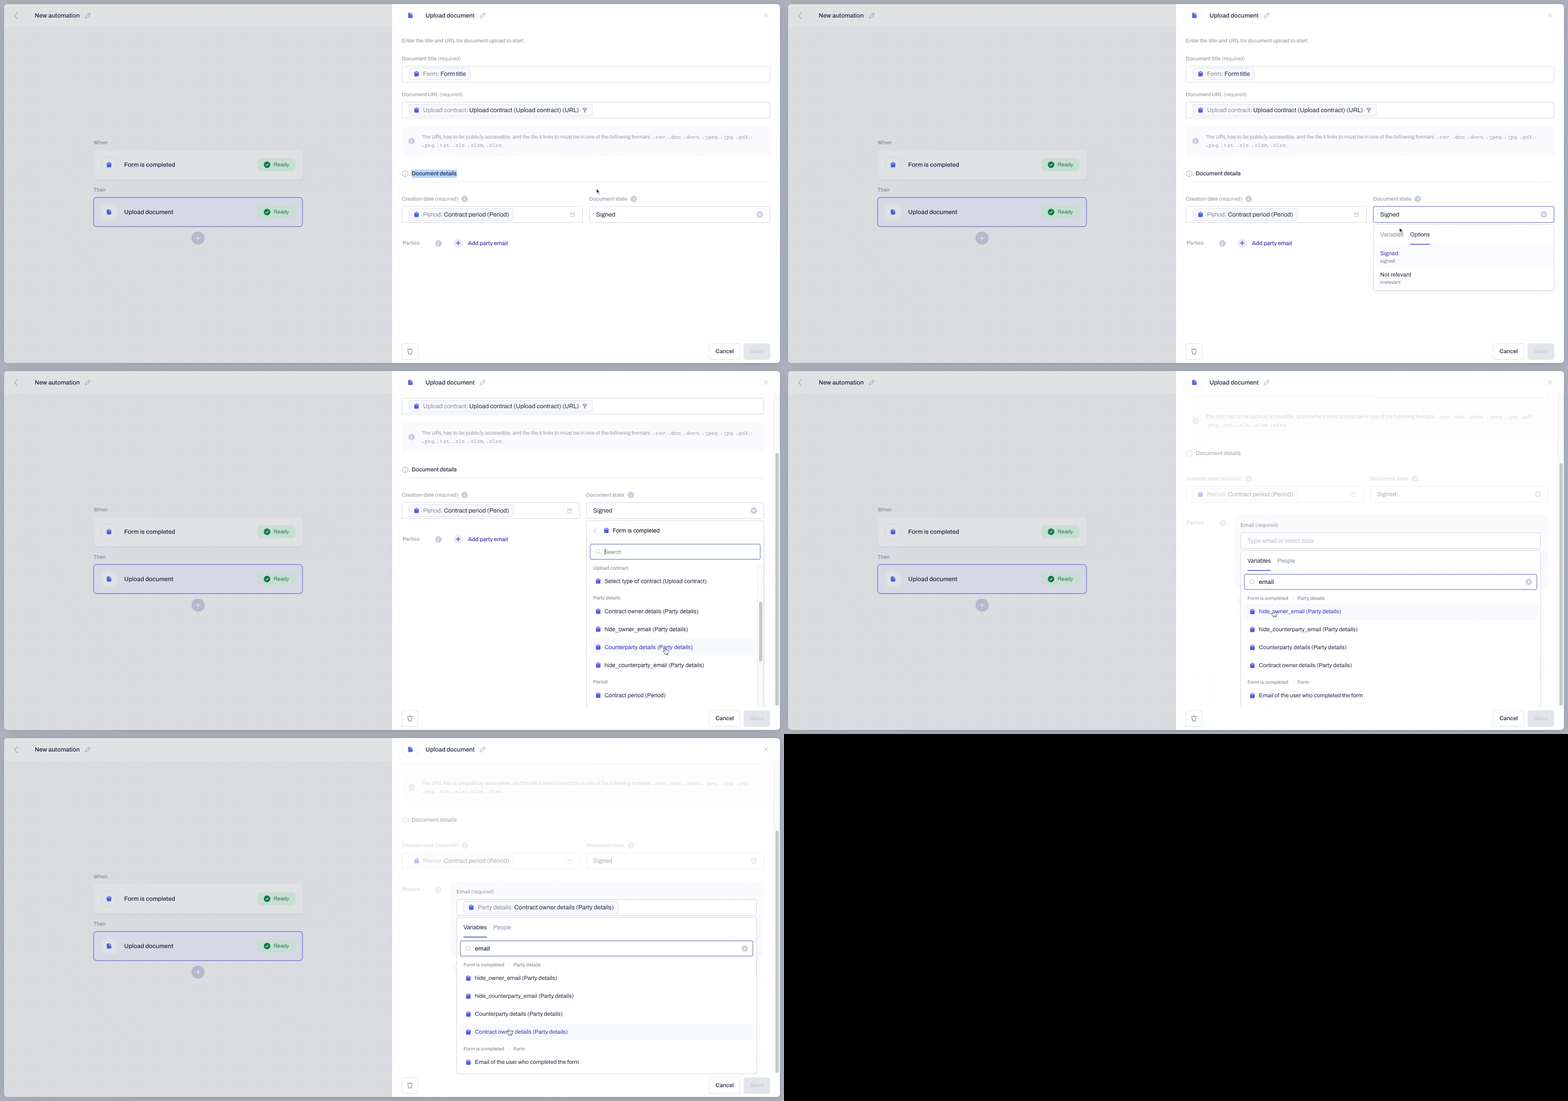
Creation date:
- This represents the date on which the uploaded contract was created.
- Add this date with any manual input or base it on a variable input from the completed form you have selected for the import.
- Use this date to sort your uploaded documents by date of creation quickly.
Document state:
- Define if the contract is signed or base the state on any variable from the completed form:

-
- If you select "signed," a digital signature with a timestamp will appear in the uploaded contract and be labeled as signed under your account. The signature timestamp will match the creation date you selected in the previous step:
![]()

-
- If you choose "irrelevant" the document label and signature fields will be marked in the following way:
![]()

- Use this detail to filter your documents based on their signature status.
- All uploaded documents will be called after the automation name you have chosen, and this is how you will be able to differentiate between the selected in this configuration document state:
Parties:
- This part of the automation configuration enables you to define the contract parties' details by manually typing in data or using any details from the completed form.
- These are the details that will eventually become the uploaded contract's parties once the automation gets executed successfully
- Note: The parties you choose will not have to sign the document again once it gets uploaded to Contractbook. All contracts you upload automatically are considered legacy, already signed documents:
Enriching the uploaded contracts with data fields
The following automation action ensures that you have turned all uploaded contracts into data-rich ones by creating data and metadata fields.
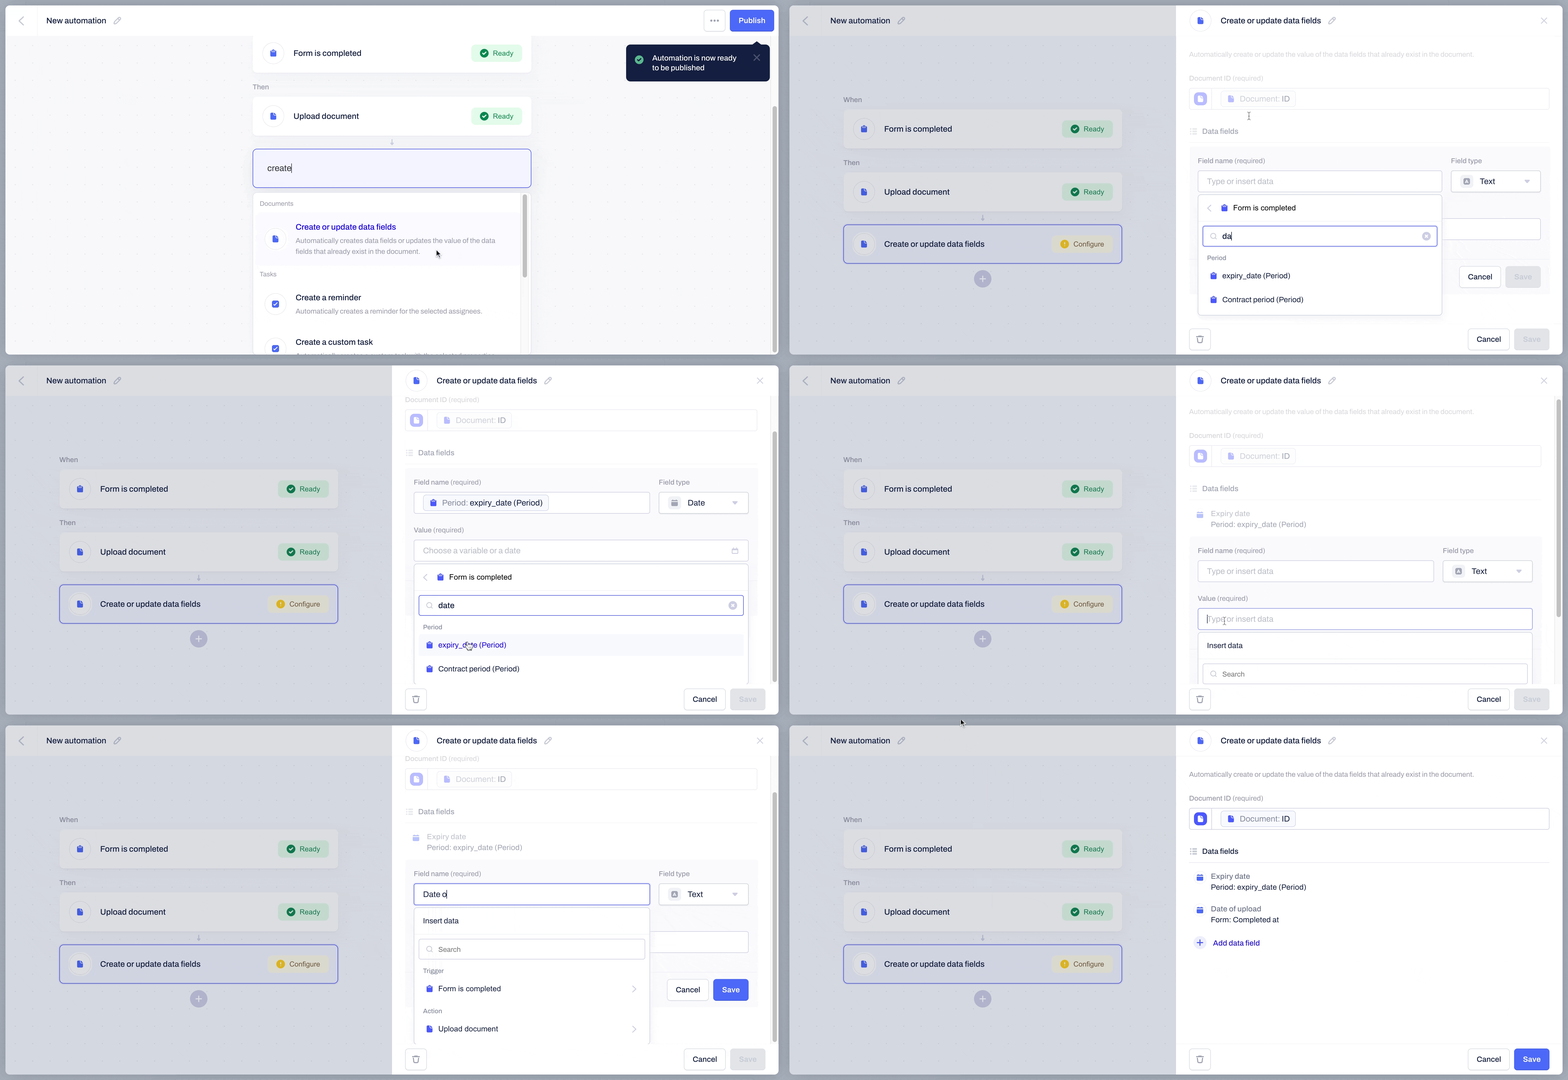
- Add an additional "Create or update data fields" step in the automation setup.
- Map out the data fields you need to create in the uploaded contracts.
- In our example, we will use the date of completing the form and the contract expiration date to create new date data fields in the uploaded agreement:
How can I publish my automation?
- Lastly, you can give the automation a new name from the upper left-side corner (by clicking on the small pencil icon) and click on publish once the configuration is completed:
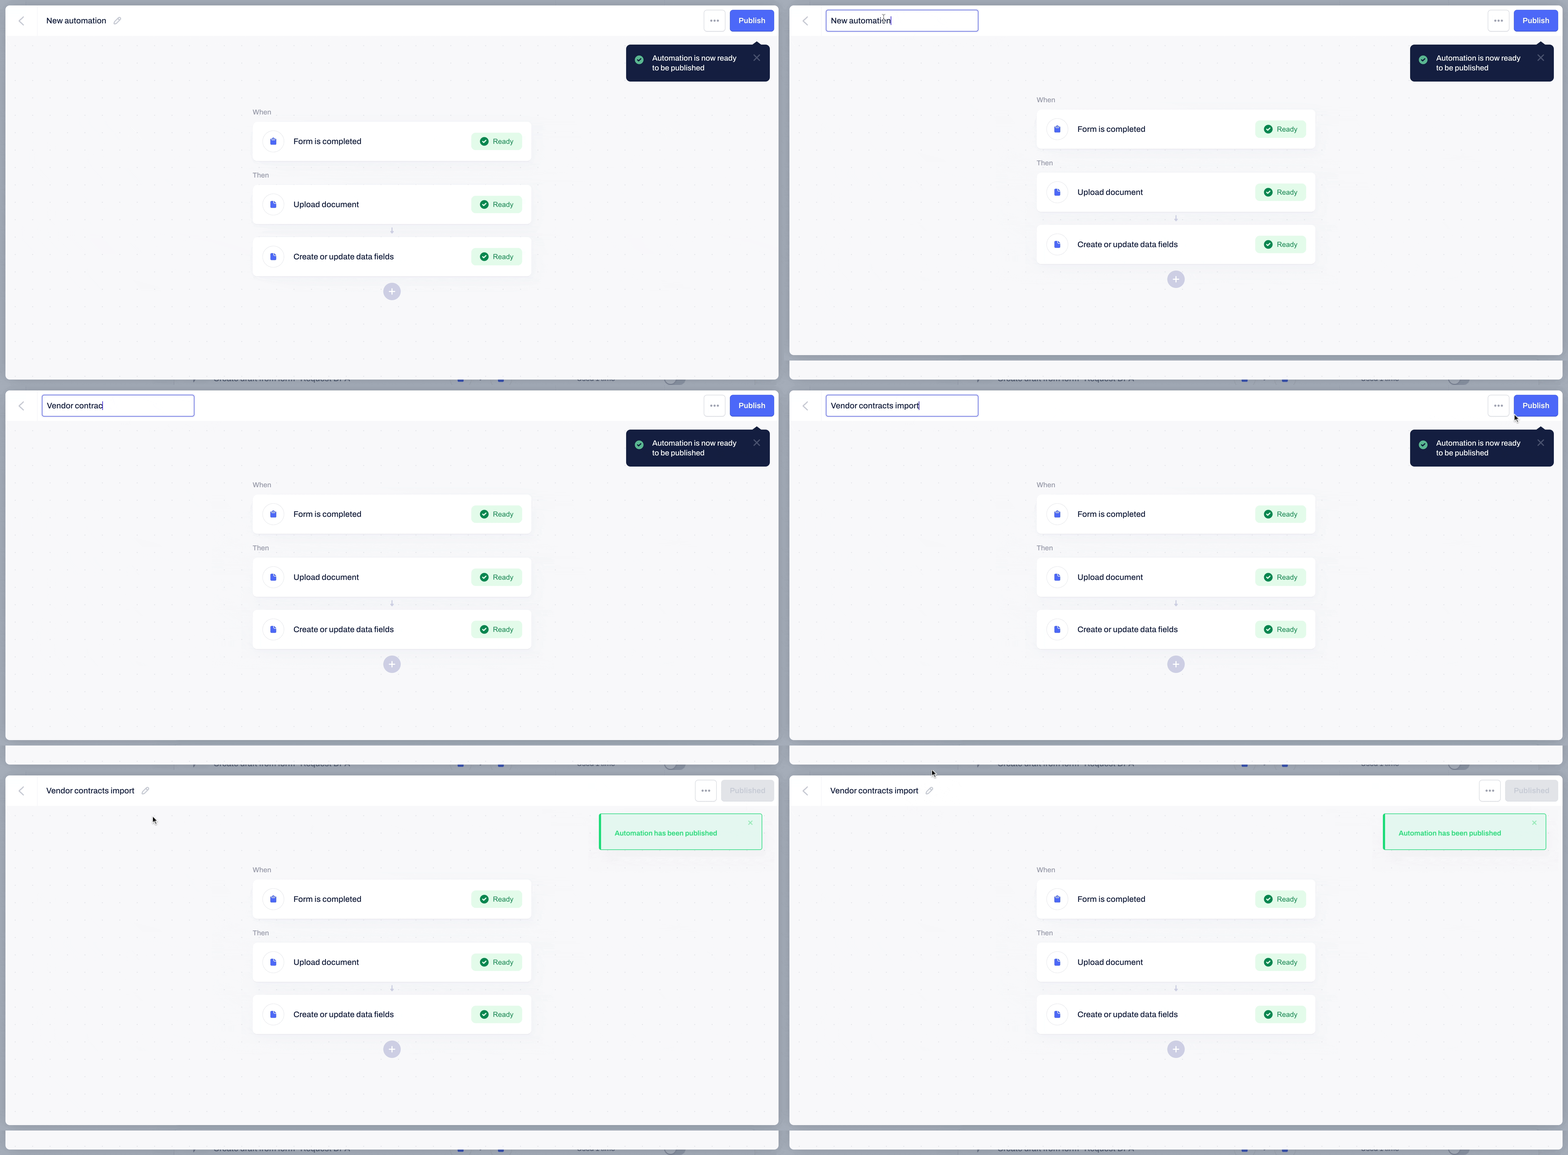
❗️Important: If you need to make any changes to the automation flow at one point, remember to unpublish it first, then make the necessary edits and click again on publish to put the flow into practice.
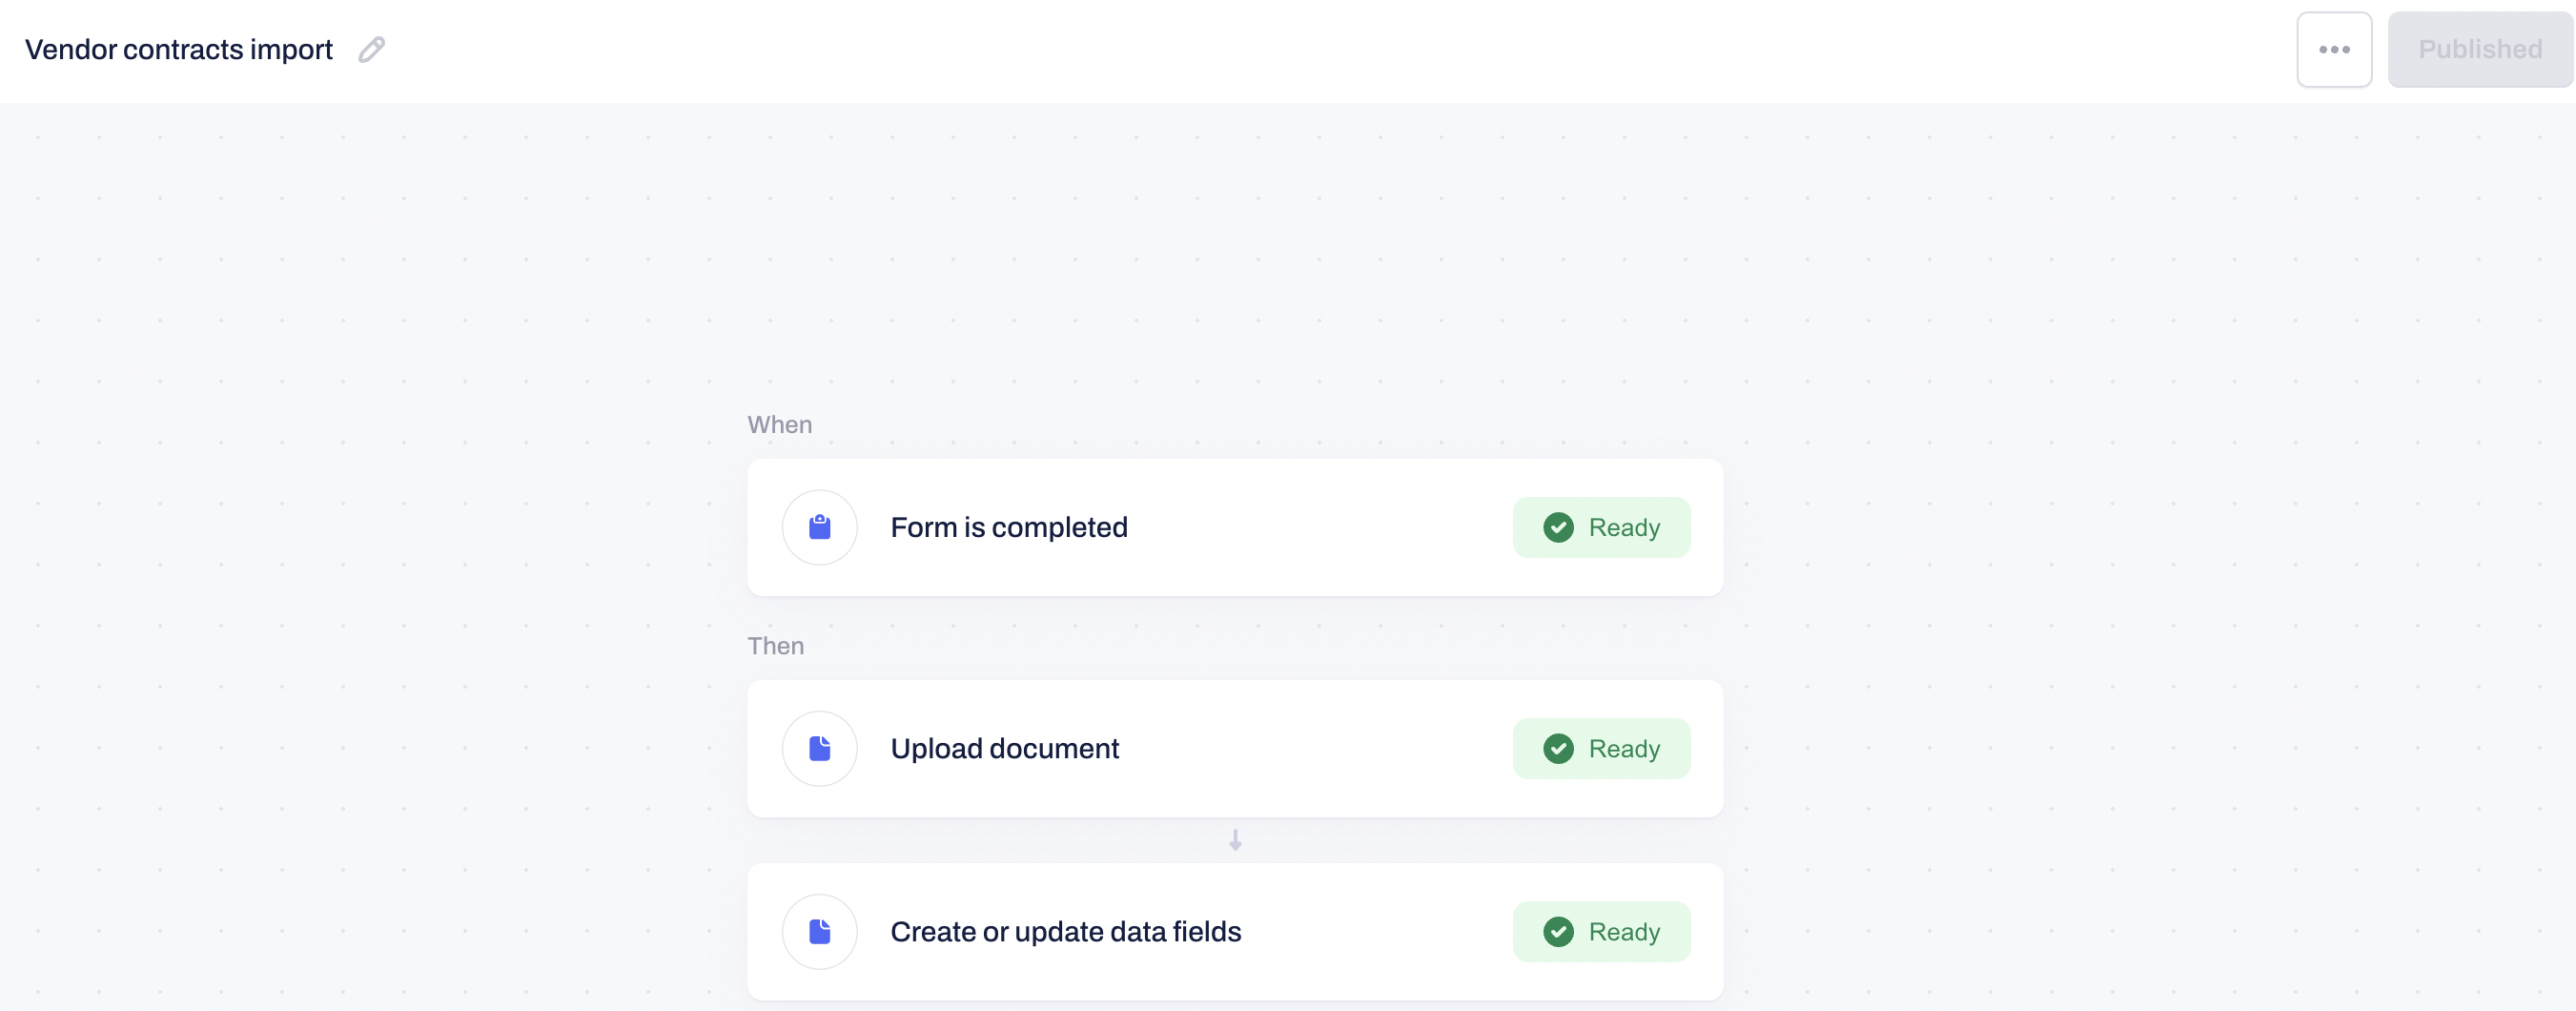
- You can control that by turning the status toggle bar on or off:

- If you click on the three grey dots next to the status toggle bar, you can open, rename, delete, or see the activity feed of the automation.
- Remember that the automation must be active (published) for the activities to be available to see.
- This option allows you full traceability of the automation's usage and flow.
- In the activity sidebar, you can see all the details of when the automation was used and the steps taken before it was triggered.
- Just click on the small arrow next to the date and time to expand the details:

- In addition, you will always be notified in-app in the notifications at the top navigation bar as soon as any of your automation flows has been executed:

❗️Important: You can modify your email and in-app notifications under profile settings for your account. You are not able to control your recipient's messages.
How can I test the automatic document upload?
- Open the form and make a complete submission. You can use testing details, as in the test performed in our video below.
- Important: You can use an alias of your email address for the party details or any other information needed for your form's completion.
- As soon as the action has been completed, return to your Contractbook account and check the in-app notifications under your tab.
- The automation status will be listed as either successful or failed:
What can I do if the automation fails?
- If the automation has failed, you can access the detailed view by clicking on the failed notification in the list under your profile notifications.
- In this view, you can identify the reason for the failure by expanding the inability to run details. You can use the information found here to change the automation from the configuration settings.
How can I check the execution of a successfully run automation?
- If the automation has run successfully, you can open the uploaded contract, which our OCR technology will scan. Any available dates will be automatically suggested for reminder task creation.
- All uploaded documents will be called after the automation name you have chosen, and their status will match the document state selected in the automation builder.
- If you have enriched the uploaded contracts with data and metadata fields, you can see them in the data fields sidebar.
- The uploaded contract will auto-populate with all the data you configured in the automation builder.
- You can always return to the automation builder and edit details or customize the steps.
- After testing the automation workflow, you can start using it, saving time by uploading any of your legacy contracts to safe storage in Contractbook and using their data for completely automated obligations management.
If you need additional information or assistance, please contact us anytime via our online support chat or email.
